In 2026, beverage producers expect filling machines to run faster, cleaner, and with fewer interruptions. Yet small leaks still appear around nozzles, valves, caps, and product-contact seals. A thin syrup may trail down a bottle neck. Carbonated drinks can foam beneath a worn gasket. Water may collect under the conveyor, almost unnoticed. These details matter because leakage wastes product, weakens packaging hygiene, and can distort production records.
So, why do beverage filling machines cause leakage? The answer is rarely one defective component. Pressure changes, incorrect valve timing, damaged seals, poor bottle positioning, and inconsistent cleaning can interact. Beverage packaging consultant Michael R. Lawson states, “A leak is rarely just a bad seal; it is usually a process signal.” That observation deserves attention, although it should not replace measured testing. Every filling line behaves differently.
This guide examines the most common leakage sources found in modern beverage systems. It considers filling pressure, nozzle alignment, gasket selection, temperature, carbonation, and maintenance habits. It also explains practical inspection methods, including checking drip patterns, tightening torque, and valve response time. Some causes are obvious. Others hide inside short production cycles.
The imperfect truth is that operators sometimes adjust pressure before checking alignment. That shortcut may reduce symptoms, not solve the cause. A reliable diagnosis needs records, clean samples, and repeated observations. It also needs experienced technicians who understand the machine, the beverage, and the container together. Small clues often reveal larger failures.
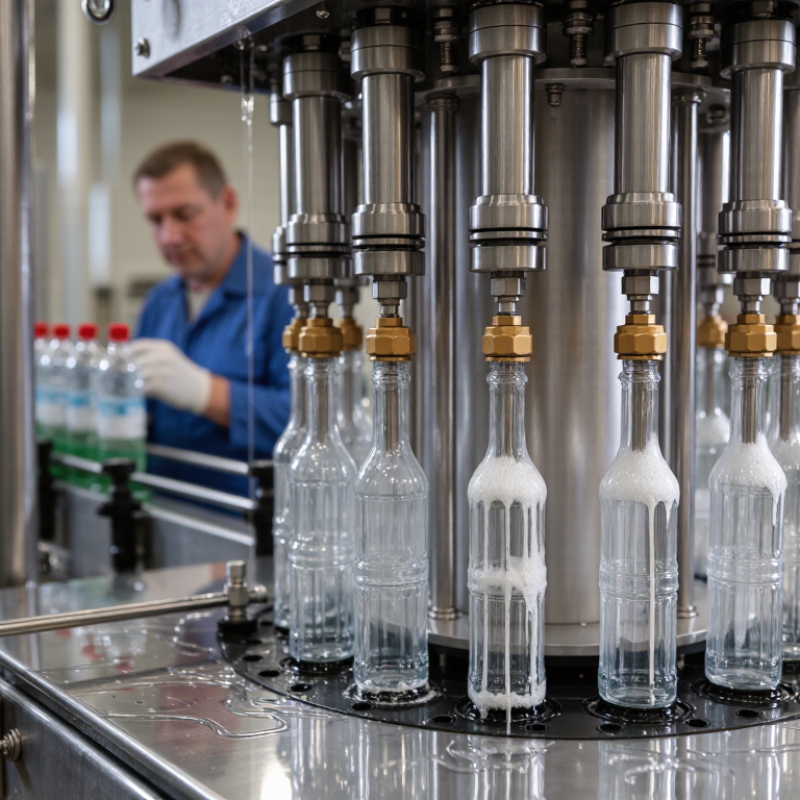
How Beverage Filling Machines Work in 2026
In 2026, beverage filling machines combine flow meters, servo-driven valves, sensors, and digital controls. Product enters a balanced manifold before each nozzle opens. The controller measures volume, pressure, temperature, and filling time. This process reduces variation between bottles. It also creates new failure points. A worn seal, foamy liquid, or incorrect nozzle height can cause leaks. Sometimes, the machine is blamed too quickly.
According to PMMI’s 2024 State of the Industry report, U.S. packaging machinery sales exceeded 10 billion dollars in 2023. Mordor Intelligence also projects roughly 4.5% annual growth for the beverage packaging machinery market through 2029. These figures reflect stronger demand for automation and flexible production. Modern systems can record leak patterns and adjust filling speed automatically. However, software cannot repair a hardened gasket. It cannot correct poor cleaning practices either. Small details matter.
Tips: Check nozzle alignment at every changeover. Inspect seals before production starts. Keep product temperature stable. During CIP cleaning, confirm pressure and chemical concentration. A simple drip test can reveal problems early. Do not trust perfect-looking data alone. Physical inspection still matters.
Technical comparison of filling principles, leak risks, operating ranges, and practical controls
| Filling Principle | Best-Suited Beverage | How It Works | Typical Accuracy* | Most Common Leak Point | Likely Root Cause | Recommended 2026 Control |
|---|---|---|---|---|---|---|
| Gravity Filling | Still water, low-viscosity juice, non-carbonated drinks | Liquid flows from an elevated tank into containers under a controlled liquid head. | Approximately ±0.5% to ±1.5% | Nozzle tip, shut-off valve, or product hose connection | Worn valve seat, excessive liquid head, damaged seal, or slow drip after shut-off | Use drip trays, valve-cycle monitoring, level control, and scheduled seal replacement. |
| Overflow Filling | Water and clear beverages requiring a consistent visible fill level | The nozzle seals against the container and returns excess liquid until the target level is reached. | Approximately ±1 mm to ±3 mm fill-level variation | Nozzle gasket, return tube, or container neck seal | Incorrect nozzle height, blocked return path, worn gasket, or unstable container positioning | Add container-presence sensors, return-line pressure monitoring, and automatic nozzle-height verification. |
| Piston Filling | Syrups, concentrates, dairy drinks, smoothies, and viscous beverages | A calibrated piston draws a defined volume into a cylinder and discharges it through the filling nozzle. | Approximately ±0.5% to ±1.0% | Piston seal, inlet valve, outlet valve, or nozzle tip | Seal wear, trapped air, sticky product buildup, or excessive discharge pressure | Use hygienic seal materials, air removal before filling, pressure alarms, and recipe-based stroke control. |
| Flowmeter Filling | Water, juice, sports drinks, and other conductive or consistently metered liquids | An electronic flowmeter measures the quantity passing through the product line and stops flow at the set volume. | Approximately ±0.2% to ±0.5% under stable conditions | Control valve, meter connection, nozzle, or flexible hose | Air bubbles, incorrect meter calibration, valve lag, or a loose sanitary clamp | Install air detection, verify meter calibration, record fill trends, and use torque-controlled sanitary connections. |
| Pressure Filling | Carbonated soft drinks, sparkling water, and other pressurized beverages | The container is pressurized before the beverage enters, reducing foaming and controlling gas release. | Approximately ±0.5% to ±1.0% | Filling valve seal, container mouth seal, pressure regulator, or gas line | Pressure mismatch, worn valve diaphragm, damaged container finish, or sudden pressure release | Use closed-loop pressure control, leak testing, gradual venting, and container-neck inspection. |
| Aseptic or Hygienic Filling | Shelf-stable milk beverages, juices, and sensitive liquid foods | Sterilized product paths and controlled filling zones maintain product safety while containers are filled and sealed. | Usually process-dependent; commonly controlled by mass, volume, or fill-level limits | Sterile barrier, valve diaphragm, seal housing, or product-line fitting | Seal fatigue, thermal cycling, incorrect assembly, or inadequate cleaning and sterilization | Apply hygienic design reviews, automated CIP/SIP records, seal-life tracking, and differential-pressure alarms. |
*Accuracy figures are typical engineering ranges for properly configured equipment and stable operating conditions. Actual performance depends on beverage properties, container geometry, temperature, pressure, calibration, and maintenance.
Beverage filler leaks often begin at the product valve, not the pump. A hardened seat, scratched sealing face, or twisted O-ring can release liquid during filling. The drip may appear beneath the machine, several inches away from its real source. In my experience, operators often tighten clamps first. That can hide the problem briefly. It may also deform the gasket and create a larger leak after cleaning. The U.S. FDA Food Code requires food-contact surfaces to remain smooth, durable, and cleanable. Small scratches therefore deserve attention, even when production still looks normal.
Other leak points include manifold joints, flexible hoses, sampling ports, and worn rotary unions. Thermal cycling makes these areas vulnerable. Hot sanitation followed by cold rinsing repeatedly expands and contracts seals. A 2024 PMMI beverage-industry report identifies maintenance access and unplanned downtime as continuing processing concerns. That finding matches a common shop-floor reality: hidden seals are rarely inspected until product reaches the floor. Utility leaks can add another warning sign. The U.S. Department of Energy’s Improving Compressed Air System Performance sourcebook reports that poorly maintained systems may lose 20–30% of compressed air through leaks. Air loss does not prove a liquid leak, but unstable pressure can expose weak valve seals. I would record pressure, temperature, fill volume, and leak location together. One reading is not enough. Even experienced teams sometimes replace the wrong part.
Beverage filling machine leaks rarely begin with a dramatic failure. They often start as a thin trail beneath a nozzle, a damp gasket, or a sticky valve seat. In field inspections, the common causes are worn seals, incorrect torque, product crystallization, and unstable air pressure. Sugar, pulp, and mineral deposits can scratch sealing surfaces. A small misalignment then becomes a visible leak during high-speed filling.
Pressure problems deserve closer attention. The U.S. Department of Energy reports that compressed-air leaks can waste 20–30% of compressor output. A fluctuating supply can leave pneumatic filling valves partly open. That creates dripping, foaming, and inconsistent volumes. Operators sometimes increase pressure to compensate. That usually makes the fault worse. Check regulators, hoses, solenoids, and exhaust silencers before replacing the whole valve.
Poor maintenance records also hide repeating failures. Deloitte’s 2023 Smart Manufacturing and Operations Survey found that 86% of manufacturers consider smart manufacturing important for future competitiveness. A simple sensor can record pressure, temperature, and valve cycles before leakage becomes severe. Still, data alone cannot detect every problem. A technician must inspect the nozzle after cleaning, feel for uneven clamp tension, and compare actual fill weight with the target. One overlooked detail can matter. Calibration intervals may also be too optimistic for abrasive or sticky beverages.
Key Causes of Beverage Filling Machine Leaks
Seal wear and damaged gaskets are the most common contributors to beverage filling machine leaks. Nozzle drip-control problems, loose connections, excessive filling pressure, foaming, and poor alignment can also increase leakage risk. Regular seal inspection, pressure checks, and nozzle cleaning help prevent product loss and contamination.
2026 Best Beverage Filling Machines: Why Do They Leak?
Leaks usually begin with a small clue: a sticky drip below the nozzle, uneven fill levels, or pressure that falls between cycles. Stop the machine and isolate its air, liquid, and electrical supplies before inspection. Check the product path from the tank to the filling head. Wipe each joint completely dry, then run a short test cycle. Fresh moisture will reveal the source more clearly. Do not tighten every fitting immediately. Excess force can damage threads, seals, and soft tubing.
Inspect the nozzle seal, piston rod, clamps, gaskets, and product hose. Look for flattened O-rings, fine cuts, hardened rubber, or residue trapped on a sealing face. Replace damaged food-contact parts with approved materials. Clean the mating surfaces first. Reassemble parts evenly and follow the equipment manual for torque and pressure settings. If the leak appears only during high-speed filling, reduce speed and check pressure stability. The cause may be vibration, not a failed seal. A rushed repair often hides the problem for one shift.
Tips: Keep spare gaskets sealed and labeled by size. Mark the leaking joint with a removable tag. Record pressure, temperature, product type, and cycle speed. These details help identify patterns. Avoid using tape inside product lines unless the manual specifically permits it. I have seen teams replace a nozzle when the real fault was a loose clamp upstream. That mistake is easy to repeat. Verify the source twice before ordering parts.
2026 Best Beverage Filling Machines: Why Do They Leak?
Leak-free filling starts with disciplined preventive maintenance, not expensive equipment alone. Common causes include hardened O-rings, scratched valve seats, loose clamps, and pressure spikes during changeovers. Inspect seals before each shift. Replace damaged parts immediately. Do not wait for visible dripping.
The U.S. Department of Energy’s Operations & Maintenance Best Practices guide reports that preventive maintenance can reduce costs by 12–18% compared with reactive work. That figure supports a simple routine: check nozzle alignment, verify filling pressure, and inspect product-contact surfaces after cleaning. Record every leak, even a small one. Small clues matter. A damp fitting may reveal vibration, poor assembly, or chemical wear. CIP chemicals and heat can quietly shorten seal life.
Use trend data when available. McKinsey reports that predictive maintenance can reduce machine downtime by 30–50% in suitable operations. However, sensors cannot replace experienced technicians. Review pressure readings, valve response time, and rejected containers together. ISO 22000-based food safety systems also emphasize documented controls and verification. A maintenance log should include part age, cleaning conditions, torque checks, and corrective action. Keep it practical. One overlooked clamp can undo a perfect inspection. Teams should also challenge their checklist each month, because yesterday’s failure pattern may not fit tomorrow’s production reality.
They often begin at the product valve, sealing seat, or O-ring. The pump may look completely dry. Liquid can travel several inches before dripping below the machine.
Check manifold joints, flexible hoses, sampling ports, and rotary unions. Inspect hidden seals after hot sanitation and cold rinsing. Thermal cycling can weaken them.
Excessive tightening may deform the gasket. It can hide the drip briefly, then create a larger leak after cleaning. Tightness is not proof of correct assembly.
Sugar, pulp, and minerals can build up around sealing surfaces. Hard deposits may scratch seats and create small gaps. A thin sticky trail can become a steady drip.
Fluctuating pressure can leave pneumatic valves partly open. This may cause dripping, foaming, and uneven fill volumes. Increasing pressure usually makes the fault worse.
Check regulators, hoses, solenoids, and exhaust silencers. Record pressure during filling, not only when the machine is idle. One reading is not enough.
Record pressure, temperature, fill volume, and the exact leak location. Compare actual fill weight with the target. A small notebook can reveal repeated patterns.
No. Sensors can track pressure, temperature, and valve cycles. They cannot replace hands-on inspection of nozzles, gaskets, and clamp tension. Data helps, but it is not magic.
Review them according to beverage conditions, cleaning cycles, and equipment history. Sticky or abrasive products may require shorter intervals. Fixed schedules can be too optimistic.
Modern beverage filling machines use pumps, valves, nozzles, sensors, and sealing components to transfer and dispense liquids at controlled speeds and volumes. When leakage occurs, it usually begins around connection points, worn gaskets, loose fittings, filling valves, hoses, or improperly aligned nozzles. Understanding why do beverage filling machines cause leakage helps operators identify whether the problem comes from pressure imbalance, material wear, incorrect installation, product residue, or poor cleaning practices.
A reliable troubleshooting process starts by stopping the machine safely, locating the first visible sign of liquid, checking pressure and flow settings, and inspecting seals, joints, valves, and hoses one by one. Damaged components should be replaced, while loose parts must be tightened and misaligned components correctly positioned. To maintain leak-free operation, facilities should schedule routine inspections, clean product-contact areas thoroughly, lubricate suitable moving parts, verify operating settings, and keep accurate maintenance records. These practices reduce downtime, protect product quality, and support safer, more efficient filling operations.

CarniTe Machinery